
Using Azure Active Directory to authorize access to your APIs
Part I: Configuring the API in Active Directory

Some time ago, I had the opportunity to fix an integration with Azure Active Directory (AAD) for one of my clients. The client wanted to use AAD to authorize access to their internal APIs, but something wasn’t working quite right. The problem was AAD was issuing access tokens that their APIs couldn’t validate: it was issuing Graph API tokens. Instead of fixing the problem, the client resorted to workarounds, such as replacing the token’s signature with a random hash (I know, I know…). After doing some research, I found out that this is a common problem when building integrations with AAD (check out this GitHub thread), and the issue lies in the scopes we specify when we request the access token.
As we’ll see in this article, AAD can issue both Graph API tokens and custom API tokens depending on the scopes you specify. To authorize access to your APIs, you want to make sure you’re using custom API tokens, since those are the only tokens whose public signing keys you have access to, and therefore the only ones you can validate.
In particular (as highlighted in this comment), you want to make sure Graph API tokens don’t circulate between the browser and your server. Graph API tokens allow you to impersonate a user, and if those tokens fall in the wrong hands, things can go very wrong from a security point of view. Graph API tokens allow you to access information from your company’s Active Directory, and in some cases (depending on their configuration) they may allow you to perform actions against the directory on behalf of the user.
Azure Active Directory is an excellent tool to manage access to your internal APIs, but to make the most of it, you need to configure it and use it correctly. The goal of this tutorial is to help you achieve that. This is a tutorial in two parts: in the first part (this article), we register our API with AAD and configure it to handle access authorization. In the second part, we build the API that uses AAD to authorize requests.
When you think of Azure Active Directory (AAD), the first thing that comes to mind is probably a tool to manage your corporate directory. However, AAD can do more than that. AAD is an identity provider service, and it can be used to control access to your APIs. In this article, I’ll show you how to use AAD to authorize access to your APIs.
Since many companies manage their corporate directories in AAD, AAD is a popular choice for authorizing access to internal APIs. Internal APIs are APIs that are only used internally within an organization, for example to support internal applications. However, you can also use AAD as an OIDC provider to authorize API access for public APIs. For example, OpenAI has OIDC integrations with both Google and AAD, and therefore you can access its API using a Microsoft identity, such as your Outlook or Skype accounts.
Using AAD to manage access to your APIs is very convenient, since you don’t need to worry about issuing secure access tokens or managing the identity of your users securely. AAD takes care of that, and your only job is making sure you’re validating access tokens correctly.
AAD authorization is based on standard protocols. We use OpenID Connect (OIDC) to identify our users, and we use Open Authorization (OAuth) to manage their access to our APIs.
In the first part of the article, we’ll set up AAD to manage access for our APIs, and in the second part, we’ll write the code that integrates with AAD to validate access tokens. The coding examples will be in Python using the popular FastAPI framework, but the same pattern is applicable in any other language or framework.
To follow along with this tutorial, you’ll need an Azure account and a user that can manage applications in Azure Active Directory.
Creating an App Registration in Active Directory
To manage access for our APIs using AAD, we need to register an application with a tenant in Active Directory. A tenant a directory of user accounts. Every Azure account comes with a “Default Directory” tenant. Most organizations can do with the default tenant, but you can create additional ones if you need to. To register the application, choose the tenant you want to register the application with (if it’s the Default Directory, you don’t need to do anything).
Go to the Active Directory service and click on “App registrations” on the left-side panel (see the image below), then click on “New registration”.

Once in the app registration menu, give it a name and select the type of accounts you want to support (see image below). You can choose from 4 use cases:
Single tenant: accept only users from your current directory/tenant. This is the default choice and also the option selected in the image below.
Multitenant: accept users from any tenant, including tenants in other Azure accounts.
Multitenant + personal Microsoft accounts: accept users from any tenant plus any user with a Microsoft account (such as Outlook, Skype, etc.).
Personal Microsoft accounts only: accept any user with a personal Microsoft account.
If you’re developing an API for internal use in your organization, choose the first option. If you’re building an API to sell a product or service to other organizations (b2b API), choose the second option. And if your API should be accessible to any user (b2c API), choose the third or fourth options.

Finally, specify the type of client you’ll use and the redirect URI. The redirect URI is the URI the user will be redirected to after a successful login, and it must be an HTTPS URL unless it’s the localhost, as in the above example. The type of your client can be a native/mobile application, an SPA, or a “web” application, which in this case means a web application with content dynamically rendered in the server. For this tutorial, we’ll choose the “web” option.
After registration, you’ll be redirected to your application’s page, in which you can see the application’s ID and your tenant’s ID (see image below). We’ll need those values when we implement authorization for our API.

Now that we’ve registered the application, we need to configure it to issue access tokens for our API. Click on “Expose an API” on the left-side panel (see image below). The application needs an identifier, aka a URI. You can set the URI to a name that makes sense to you, or you can let AAD generate a random value for you. If you want the custom name, click on the “Set” button in the “Application ID URI” field, and add your preferred URI. Make sure it complies with AAD’s supported URI formats (check out the docs). An example of compliant URI is api://microapis. Also, bear in mind the application URI must be unique.

Configuring access: adding API scopes and additional permissions
Next, we add scopes for our API. In OAuth, scopes define which operations and resources a client can access on the API server. We use scopes when we have different access privileges depending on user group or function. When we use scopes, the client application (e.g. the UI) requests access tokens with the relevant scopes from the authorization server, and the token shows the scopes in the payload.
AAD requires you to set scopes even if your API doesn’t use them, since the scopes determine the type of token that AAD will issue for us. When we request access to our API, AAD requires the user to pass a list of scopes, and depending on the scopes they specify, AAD will issue a custom API access token or a Graph API access token. If the request only includes custom API scopes, AAD will issue an access token for our API application. If the list of scopes includes a Graph API scope, like User.read, AAD will issue a Graph API access token. Graph API access tokens must be used only to access Azure’s Graph API and we typically use them to retrieve user details. Graph API tokens’ signing keys aren’t publicly available, so we can’t validate their signatures and therefore we cannot use them to authorize access to our APIs. This is a very common source of error when building integrations with AAD, and later in the article we’ll see practical examples of how we request each type of token.
To add scopes, click on “Add a scope” (see image below) and fill in the details in the panel that pops up on the right:
Scope name: a name for the scope. The recommended format is resource.operation.constraint. For example: jobs.read.all. In most cases, resource.operation is sufficient, e.g. jobs.get. Operations can be CRUD (e.g. list, create, get, etc.), or represent meaningful actions. For example, in a job portal, a candidate will be able to apply for jobs (jobs.apply), while an employer will be able to create job listings (jobs.list).
Who can consent: whether all users can consent to the scope or whether admin privileges are required.
Admin consent display name: a brief description the admins will see if their approval is required.
Admin consent description: a more detailed description for the admins.
User consent display name: a short description of what the user is consenting to.
User consent description: a more detailed description of what the user is consenting to.
State: whether clients can request this scope. If the scope is enabled, clients can see and request the scope. If you want to deprecate the scope, it’s recommended to first set it to disabled so that users can’t request it anymore, and give a grace period (e.g. one week) before you delete it.
Lastly, click “Add scope”.

In addition to the custom API scopes, we can configure access to other applications or to Azure APIs. We configure those permissions through the “API permissions” panel (see image below). By default, our APIs have access to Graph API’s User.Read scope, which means our API users can request that scope to get read access to user details in Azure’s Graph API. This is useful if we need to retrieve user details to populate our UI. Just remember, those are Graph API access tokens that we cannot use to authorize access to our custom APIs.

Restricting access to specific user groups
We can further restrict access to our API to specific user groups from Active Directory (to apply group-based restrictions you’ll need a premium Azure Active Directory plan). For example, we may want to restrict access in development or staging to a specific group of users from our organization. To do that, you need to create a group of users in AAD Enterprise application (image below).

Then, configure access for your custom API through the “Enterprise Applications” panel (image below). Enterprise Applications is a directory of identities for your applications. The representation of an application under Enterprise Applications is called service principal.

Click on the service principal of your API and then on the “Properties” tab on the left-side panel. The “Properties” view allows you to configure how users can access your API. Check that the “Application ID” field matches the “Application (client) ID” field we got after registering our application. The “Enabled for users to sign-in” controls whether users can request access to your APIm and the “Assignment required” field controls whether users need to belong to a specific group to get access to the API. For this tutorial, we’ll leave “Assignment required” set to “No”.

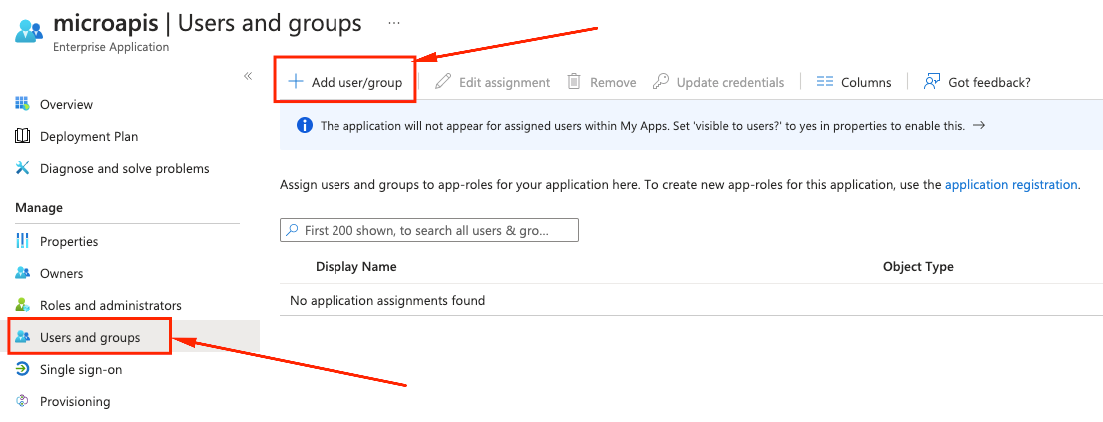
If you set “Assignment required” to yes, only users who are authorized to access the API will be able to get access tokens. To authorize specific users or groups, click on the “Users and groups” tab in the left-side panel, and then click on “Add user/group” (see image below).
If you have a premium Azure Active Directory subscription, you’ll be able to add groups, otherwise add specific users from your directory. Remember, only these users and groups will be able to obtain access tokens.
Issuing secrets to securely request access tokens
To allow our application to request tokens from AAD’s authorization service securely, we need a secret that identifies our client. To issue a secret, click on “Certificate & secrets” in the left-side panel, then on “Client secrets”, and then click on “New client secret” (image below). For security, make sure you rotate your secrets often. Once you’ve added the secret, you’ll see its value and ID.

Once you create the secret, you’ll see the secret’s value and its ID (image below). Make sure you copy and save the value now as it won’t be visible anymore after creation.

You’re good to go! In the second part of this tutorial, we’ll build an API that uses this app registration to authorize requests using Azure Active Directory. Stay tuned!
If you liked this post, you’ll like my book Microservice APIs. Use the code slperalta to obtain a 40% Manning’s website. You can also get the book on Amazon.com.
I’m on a mission to help organizations deliver reliable and secure APIs and microservices. To this end, I run public webinars, I publish content regularly in this newsletter, and I maintain open source projects like fencer, an automated API security testing tool. I streamline my consulting and training efforts through microapis.io. If you work with microservices and APIs and need a consulting or training session, don't hesitate to get in touch directly or arrange a call!